«baci di dama» hazelnut & dark chocolate cookies«baci di dama» hazelnut & dark chocolate cookies«baci di dama» hazelnut & dark chocolate cookies«baci di dama» hazelnut & dark chocolate cookies«baci di dama» hazelnut & dark chocolate cookies«baci di dama» hazelnut & dark chocolate cookies«baci di dama» hazelnut & dark chocolate cookies«baci di dama» hazelnut & dark chocolate cookies«baci di dama» hazelnut & dark chocolate cookies«baci di dama» hazelnut & dark chocolate cookies«baci di dama» hazelnut & dark chocolate cookies«baci di dama» hazelnut & dark chocolate cookies«baci di dama» hazelnut & dark chocolate cookies«baci di dama» hazelnut & dark chocolate cookies

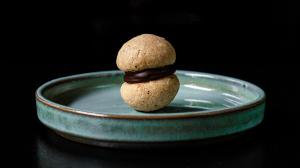
Crumbly orbs of nuts, butter and sugar, each representing half of a kiss, with the chocolate uniting and sealing their love. Tiny “baci di dama” or “lady’s kisses” take long to make but are so satisfying and exquisite to eat and, like toasted hazelnuts, they don’t last long !

The “baci di dama” are biscuits originating in Piedmont, where they were born a century ago. They are so called because they are composed of two cookie shells joined by chocolate, that recall two lips intent on kissing.

Legend has it that these sweets were born from the imagination of a cook of the House of Savoy in the autumn of 1852 at the request of Victor Emmanuel II to taste a new dessert. The product met with approval and has since been served on royal tables in Italy and, later, all over Europe.

After several tries with equal weights of flour, hazelnut powder, sugar and butter and also freezing the dough balls before baking them, the cookies spread out and ended up as flat cookies but were a delicious mistake. 

I finally doubled the flour quantity, as compared to the quantities of the hazelnut powder, sugar and butter and it was a success. The cookies retained their domed shapes and were crumbly, crunchy and tasty.

Here are some important points to remember : 

- the dough will be rather dry, so add some water or hazelnut liqueur to bind it and press it together into a smooth ball and let it rest and chill in the refrigerator before shaping into little balls, which are tiny (about 2 cm in diameter and only weigh about 5 grams each) and they must be that small because if they were larger, they would require more baking time and thus inevitably flatten out.

- freezing the dough is also necessary step, otherwise they will flatten while baking (first at 150°C and then at 120°C).

- for the chocolate filling, you must melt the chocolate but then wait for it to get firmer again (I waited 15-30 minutes) so that you can delicately spoon some chocolate onto each of the two half-shells, on the flat side, delicately balanced on a cooling rack, then wait again before assembling the two chocolate covered half domes, so that you end up with a thicker chocolate filling that won’t simply be squeezed out onto the sides when assembled.

I will not lie to you, they are time-consuming to make and disappear quickly too, because they’re such a delight ! … :)

«baci di dama» hazelnut & dark chocolate cookies

15.06.2024

60 pieces x 12 grams each

ingredients

  • 250 grams (2 cups) cake & pastry flour (or make your own cake & pastry flour by replacing 4 tbsp of all-purpose flour with 4 tbsp of cornstarch)
  • 125 grams (1 cup) toasted hazelnut powder/meal
  • 125 grams (1 cup + 2 tbsp) extra-fine sugar
  • 125 grams (½ cup) butter, cubed & chilled
  • 2,5 ml (½ tsp) vanilla extract
  • 2,5 ml (½ tsp) hazelnut extract
  • 1,25 grams (¼ tsp) fine sea salt 
  • 10 ml–15 ml (2-3 tsp) water (or hazelnut liqueur), to better bind the dough
  • 125 grams (½ cup) dark chocolate (at least 70%), melted

instructions

  • use roasted hazelnuts that you can reduce to a finer powder in a food-processor or simply toast your hazelnut flour in a large baking pan, covered with a sheet of baking paper, with the hazelnut meal spread out on top and bake in the oven at 180°C for 5 minutes, then set aside and let it cool down
  • place all the dry ingredients in a large food-processor (hazelnut meal, cake flour, salt and sugar and pulse several times to mix, then add the cold and cubed butter and pulse again until sandy and finally add the extracts and water (or liqueur) and pulse until it becomes a more compact mass
  • transfer the cookie dough mixture to your work surface and press it together until it becomes a smooth mass, place inside a bowl, cover with plastic film and chill in the refrigerator for at least 30 minutes before shaping into small dough balls
  • *note : I like to be very precise so I use a scale that is exact to 1/100th of a gram to weigh each dough ball individually but a regular kitchen scale is fine and they should weigh a maximum of 5 grams each and measure 2 cm in diameter maximum …
  • pinch small pieces of dough and roll into small balls (and weigh each if you can) for a dough ball that will weigh 5 grams maximum, then use slightly wet hands to roll between your palms until smooth and round and place inside a flat container covered with baking paper (that will also fit inside your freezer later) until you have approximately 120-124 balls of dough (for a total of 60-62 cookies)
  • *note : if you prefer, you can separate the big ball of dough and roll into several long lengths and then slice each into little sections and then roll into balls (whatever is easier for you) …
  • after all the cookie dough balls are rolled and ready, place inside the freezer for at least 60 minutes before baking
  • preheat the oven to 150°C with the rack towards the middle
  • when ready to bake, place approximately one quarter (approximately 30-31 dough balls) on a large baking sheet covered with baking paper (leave the rest in the freezer) and bake for 10-12 minutes and then rotate the baking sheet and lower the heat to 120°C and bake for an additional 5-6 minutes and remove from the oven (they should be pale and only slightly golden in color), let them cool down before touching them (they are very fragile) and then place them on a rack and repeat 3 more times with the rest of the cookie dough balls, until all dough balls are baked and cooled
  • place the baked cookies on a grid with the domed part on the underside and the flat surfaces upward, so that they remain upright and stable, when ready to add the chocolate
  • melt the chocolate in a bain-marie and then let it cool and firm up for 20-30 minutes before spooning a ¼ tsp of chocolate on the flat side of each cookie half (thus on 120-125 cookie halves) and then let the chocolate solidify slightly more before assembling them and wait until the sandwiched assemblies are completely solidified before handling again
  • once the chocolate is set, the cookies can be refrigerated for several weeks in an air-tight container and served at room temperature or slightly chilled …