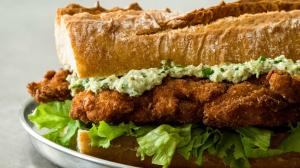
the 3-step fried chicken sandwichthe 3-step fried chicken sandwichthe 3-step fried chicken sandwichthe 3-step fried chicken sandwichthe 3-step fried chicken sandwichthe 3-step fried chicken sandwichthe 3-step fried chicken sandwichthe 3-step fried chicken sandwichthe 3-step fried chicken sandwichthe 3-step fried chicken sandwichthe 3-step fried chicken sandwichthe 3-step fried chicken sandwichthe 3-step fried chicken sandwichthe 3-step fried chicken sandwichthe 3-step fried chicken sandwich

When we were kids, every Saturday, after school (YES, my sister and I went to regular French and English school on weekdays and Greek school on Saturdays), my father would treat us to Kentucky Fried Chicken or McDonald’s (it was all new to us and YES, my dad is the sweetest). This may explain why many of us automatically eat these foods outside the home or do take-out or delivery (the pizza-syndrome). Making FRIED CHICKEN at home isn’t difficult nor a secret, it just requires a few steps. The first is tenderizing, then multi-coating and then frying. These steps are easy and done with ingredients we all have at home and yet do not use often enough ! For brining, you use the liquid from any pickled vegetables (I have a lot of that and it helps break down the tougher protein fibres and will keep it juicy), then the multi-coating is a combination buttermilk (or half yogurt and milk) with egg and then a coating of different starches and spices and then of course the actual frying (or even double-frying if you do half the total frying time before and final frying right before eating). Let’s start simply with a sandwich, I love baguette, I love lettuce, I love a light, herby, tangy creamy sauce, put it all together and  … TadaaaaaaaHOME-MADE 3-STEP FRIED CHICKEN SANDWICH (and a few extra steps for the sauce and putting it all together). And why not use chicken thighs which is wonderful darker meat ? Because I’m not too good or handy at de-boning, well, not yet … All that’s missing are perfect fries, but I have 3 methods to experiment with before I share that with you … Give me some time guys ! :)

the 3-step fried chicken sandwich

20.10.2015

2 large sandwiches

ingredients

meat

  • 2 chicken breasts (175-200 grams each or 350-400 grams total)

brine

  • ½  tsp salt
  • ¼  tsp ground pepper
  • ½ cup pickle juice (you can add ½ tsp extra pickling spices for extra flavourings : a mix of mustard seed, coriander seed, fennel, allspice, dried bay leaf)

1st coating

  • ¼ cup cornstarch or a mix with potato starch (40 grams)

2nd coating

  • ½ cup buttermilk (combine 125 grams milk + 1 tsp white vinegar and let sit and thicken for 30 minutes)
  • 1 egg (beaten)
  • optional : 1 tsp strong alcohol like vodka, whisky, ouzo (which will evaporate more quickly and be less greasy when you fry)

3rd coating

  • ½ cup flour (65 grams)
  • ½ cup bread crumbs (60 grams)
  • ½ tsp baking powder (double to 1 tsp in North America)
  • ½ tsp salt
  • ¼ tsp pepper
  • ½ tsp onion powder
  • ½ tsp garlic powder
  • ½ tsp paprika

frying

  • 2-3 cups vegetable oil for frying

chicken sandwich sauce (for 100 grams or ½ cup) :

  • 3-4 pickles (40 grams)
  • 3 pickled onions (if you have some in the jar of pickles)
  • 1 garlic clove (5 grams)
  • 1-2 green onions (20 grams)
  • 1/3 green pepper (50 grams)
  • ¼ cup chopped fresh parsley
  • 1 tsp Dijon or strong mustard
  • 3 tbsp mayonnaise
  • 3 tbsp plain greek yogurt
  • ½ tsp salt
  • ¼ tsp pepper

instructions

  • begin by flattening out and evening out your chicken breasts by pounding them with a rolling pin
  • make some shallow criss-cross cuts with a knife on both sides (to better absorb the brine and have more surface area for the batter to adhere to it) and then sprinkle abundantly with salt and pepper
  • place your pickling juice (and extra flavourings) in a sealable  bag with your chicken breasts, squeeze out excess air, seal bag and let sit in the refrigerator for 2 hours (or 4 hours maximum)
  • prepare the sandwich sauce by finely chopping the green pepper, green onions, garlic, fresh flat-leaf parsley and pickles (pickled onions too if there were some in the jar) in a food processor and squeeze out excess liquid using a strainer and a spoon

optional : add the green juice to the brine with the chicken !

  • combine all chopped ingredients with the creamy ingredients (mayonnaise, yogurt, mustard), add salt and pepper and set aside in the refrigerator
  • prepare your coatings in 3 separate bowls : place the cornstarch in the 1st bowl, the buttermilk and egg mixture in the 2nd bowl and finally the flour, breadcrumbs, baking powder and dry spices in the 3rd bowl
  • remove the chicken breasts from the refrigerator, pour out the pickling brine and discard juice and pat dry the chicken breasts
  • start heating your oil for frying in a heavy pan (I prefer using a wok and a large spider skimmer)
  • completely coat the chicken breasts with the cornstarch, shake off excess and let sit for a few minutes until the oil is sufficiently hot to 180°C (it will drop to 160°C when you begin frying)
  • dip the chicken breasts in the 2nd coating of buttermilk and egg and then directly in the dry coating and pat down to coat well and thickly (sprinkle with more coating n°2 and add more coating n°3 for extra thick crust)
  • gently lower the first piece in the hot oil until well browned and crisp on each side, wait for the oil temperature to rise again and fry the second piece (about 3 minutes on each side)

note: you may also fry them partly (not completely and a light brown colour) the 1st time and then re-fry them several hours later before eating for an extra crispy coating

  • assemble the sandwich using cut and toasted baguette bread, then chopped lettuce, then the fried chicken, add the sandwich sauce and top with baguette.